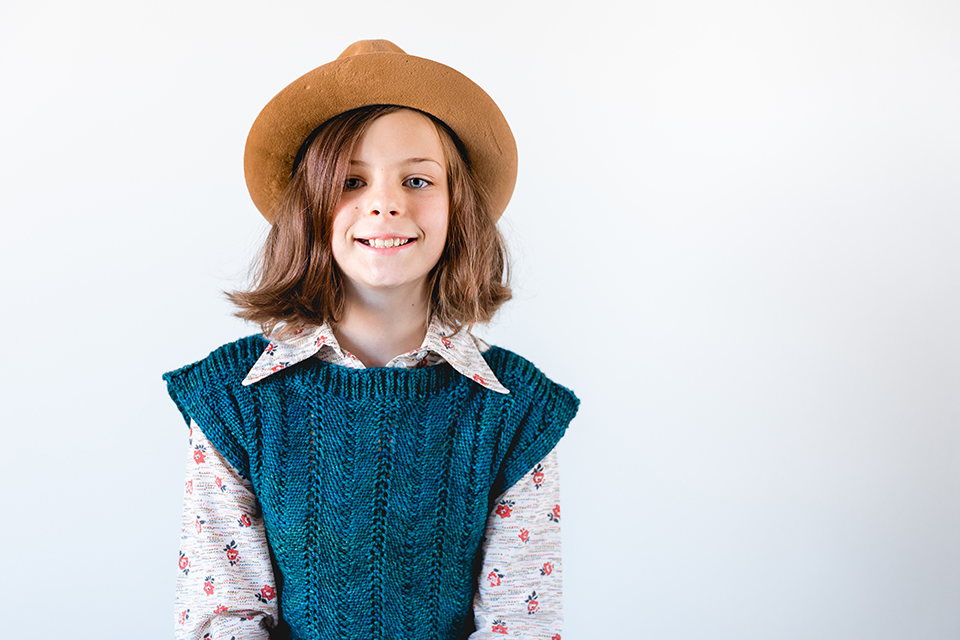
Recently I had the opportunity to take some portraits of a creative and stylish young lady, a sixth grader. He mom and I picked a date and time, I had them come to my new studio space and here is some information on how my mind works before, during and after a shoot.

Portrait of a Sixth Grader
1. The Space
Now, the space available to shoot in is a smaller studio space with hard floors, white walls and one big window.
We pick the wall just next to the window and decide to shoot with ambient light since it is sunny and strobe lighting is not really needed.
2. TheShoot
Now how do you interact with the subject? How do you interact with any subject?
Make the subject feel comfortable, confident.
Now, my subject being a sixth grader, there isn't much on the table that we can talk about. But wait, her mother said she picked out her outfit, picked out her hat, that she loves hats. So... I tell her that I really like her hat! Her face lights up, she is grateful that I said something, I look back and forth between her and her mother asking about themselves, their interests. And when there is a lull in the conversation, I take a shot.
Now, the trouble with any shoot, any interaction really. How to make the interaction flow, how to avoid pauses, avoid the awkwardness to creep in. As I will be the first to admit, I am not the best at this, I am not. I try... But I am bad, but here are a few tips and I used some in this shoot.
a. Relate to your model or subject. Now with my subject being a sixth grader there isn't too much under the sun that we can relate to but, I did remember her mother saying that she picked out her own outfit for the shoot, picked out each piece including her hat and that she loves hats. So I took that, I was honest and I told her that I really liked her hat... Boom! Her face lights up enough to know that she will be good with a few shots. I add on to that by saying that colors she picked really look cool against the white walls of the studio. And we take some more shots.
b. Talk to your subject, ask them about themselves and keep it going. I took the small breaks from changing settings, using the tripod, adjust my feet and I asked my model and her mother about themselves. I was able to find out that in fact she was a 6th grade student at a local school (which I had not known until then), that her mother is a teacher at a school that was known to me ever since I was little. I learned that she is an only child, she is creative, she loves creating things and she has been practicing posing in the mirror at home before the shoot!

She was sitting in my chair as we took a break and I saw from the corner of my eye that she was doing this simple, cool, super relaxed pose. I told her to wheel herself over and we were going to do that again.
c. Encourage your subject! Is there a look, a pose a face that caught your eye? Say something! "Oh what you did just there"..."That thing you did with the hat"..."How you put your arm there"... Giving this feedback is not only nice to hear from their perspective but is great for you because it will reinforce the looks you are going for, they will grow from that and learn as the shoot goes. Makes it better for everyone.

Silly face 2 of 3 in the quick series for best faces.
d. You can be silly. No saying this has two parts to it. One, you do not want to be a clown, a character you are not and just make the shoot zany. Two, you do want to keep relating to your model. You are no longer asking them about themselves... But with a quick "Ok... Let's try some silly faces" and telling them to pick there best 3 silly faces, it can lighten the mood just for a sec, gets them to open up and you can get some great informal shots from it.

Close up