A Portrait of a Butcher - Beltex Meats

In this post I will share some information on how I went about getting some portraits of a local butcher for SLUG Magazine and their upcoming Food Issue.

GEAR USED AT THE END OF THIS POST!! 

BEFORE THE SHOOT...

An opportunity to photograph a local shop owner for a feature about their new shop? I am in!

The information I was given is that there was a new butcher shop and meat vendor in the downtown Salt Lake area, the owner is my subject, a time and an address. I am told I have about 15 minutes to take some shots before the shop opens.

I arrived 10 minutes early, I park in front of the shop, take out my C-Stand and attach it to the wheel base, grab my bag and I walk up to the shop's entrance. Since it was closed that means I have the pick of any location in inside to make my images, no customers will be shopping, just me and my subject.

THE SHOOT...

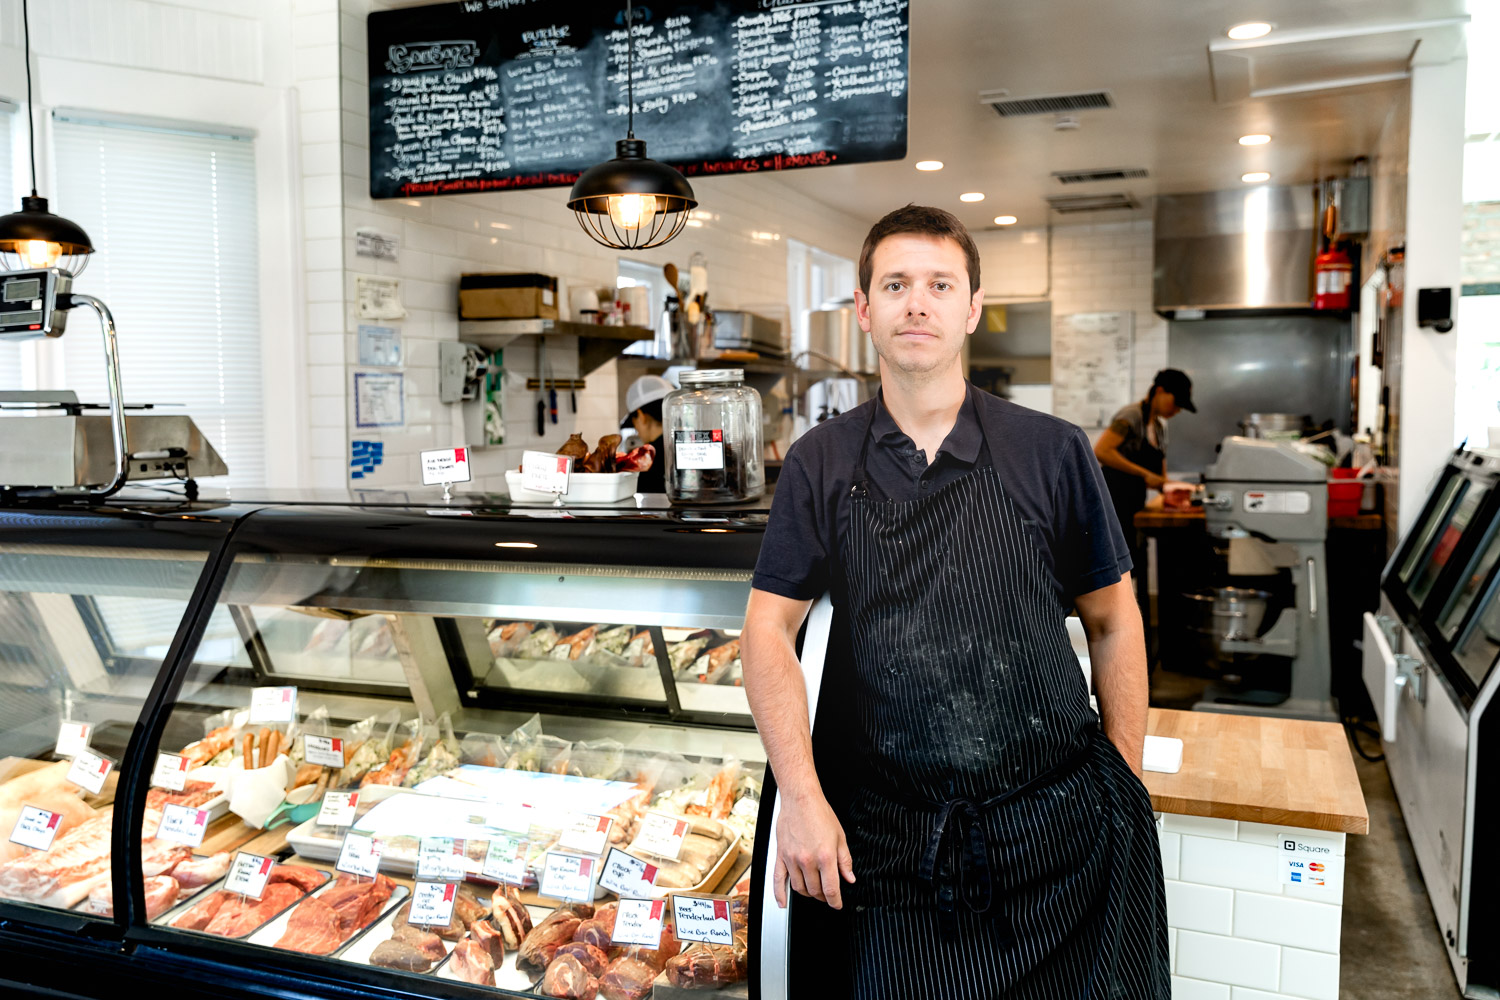
I meet my subject, owner/operator Butcher Philip Grubisa, shake his hand and ask him if I can take a look around the shop to find a good place for the portraits.

The interior of the shop is open, not too large and has about 12' white ceilings. (See Video)

I decide the use two display cases, one shorter case more towards the entrance and the other just on the other side of the pillar that is taller.

As with all indoor shoots, the light available might not be the best for a portrait and or might not be bright enough for a photo at all. The below image shows before the addition of flash at usable settings.


I have Phillip place himself on the side of the shorter display case a sort of seated lean, super casual. I do not use a direct light source for this shot, seeing the large glass case and the narrow walkway, getting the position of the light stand just right would be impossible. I opt to use a 7' reflector to direct the light from the strobe away from the subject and toward the ceiling, they are low enough and will reflect the light downward, spreading it evenly.

I grab these two shots...

I move onto the other side of the main beam in the room to work against the taller display case in the shop.

Turning my C-Stand and light so that it fired on the correct side of the ceiling beam like so...

Using a diferent angle by holding the 5D IV over head. I used the touch screen I was able to get these shots...

At last I bring the angle back down to a shoulder to eye level shot. I ask Philip if he has any meats we can grab and put on the counter next to him.

I leave the light as is, and we capture a few more shots.

AFTER THE SHOOT... 

My final shots being submitted and 


Gear Used

I take with me the following gear, please follow these links to see the product details and if you purchase from them through these links, it helps me out a bit. Thanks!

Canon 5D Mark IV

Canon 24-70 f/2.8 USM II

Xplor 600 Monolight with 7" Reflector

Impact C-Stand with arm

Kupo C-Stand Base with locking wheels

Neewer 43" Umbrella Softbox

Lowepro AW 200 Messenger Bag


Thank You For Looking!

If you are in need of a Photographer

Contact me at LOGAN@LMSORENSON.NET

or (801) 455-9957

QUESTIONS WELCOME!!!

Give a follow on

Instagram, Twitter, Facebook, Flickr, Tumblr

Farmer's Market - Testing the new Canon 6D Mark II

Having just upgraded my back up body from the Canon 6D to the newly released Canon 6D Mark II, I want to show how I took a few hours during the weekend to test this new body out... The Saturday Farmer's Market in Downtown SLC was the perfect opportunity.

I took my bike downtown with my plan: To capture as many portraits and images of people shopping, the wares available to display the capabilities of the new camera. 

The Farmer's Market, during a sunny day posts a great challenge for any camera as there is so much sunlight in mid day, scattered shade and lots of strong contrast from tent to tent. I use both manual mode, and aperture priority to get used to what the camera will set to. I use the swivel screen, touch focus, touch shutter, the only setting I leave alone is the metering mode, set to Center Weighted because the focus points are very much center weighted and would balance the subject in focus being appropriately exposed.

I jump right in treating this "test shoot" as I would any assignment by a publication for getting the overall energy of the scene with a mix of environment and portraits.


These images are all edited and presented as I would for online presentation (i.e. gallery, website, local news, social media, etc.)


I take some shots of the first tents wares.

ISO 320 - 50mm - f/4 - 1/1250 - AV

ISO 320 - 50mm - f/4 - 1/1250 - AV

ISO 320 - 41mm - f/4.0 - 1/80 - AV

ISO 320 - 41mm - f/4.0 - 1/80 - AV

So far I really am liking the colors, the amount of detail and the focus nailed by the live view dual pixel auto focus.

Continuing on...  I approach some vendors as I walk down the road.

The very sweet Linda Hart of Linda Hart Designs - www.LindaHartDesigns.com ISO 320 - 33mm - f-4.0 - 1/800 - Manual Mode

The very sweet Linda Hart of Linda Hart Designs - www.LindaHartDesigns.com 

ISO 320 - 33mm - f-4.0 - 1/800 - Manual Mode

This portrait of Linda was very promising, I was able to recover a lot of the highlights behind her to a level that I would normally wish. 

*Hint - Taking photos of a business card ensures you will not lose it or it will not get sweaty and crumple in your pocket!

Redbard Collections - www.RedBarnCollections.com | ISO 320 - 28mm - f/4.0 - 1/160 - Manual Mode

Redbard Collections - www.RedBarnCollections.com | ISO 320 - 28mm - f/4.0 - 1/160 - Manual Mode

www.VinyliciousDesigns.com | ISO 320 - 31mm - f/4.0 - 1/320 - Manual Mode

www.VinyliciousDesigns.com | ISO 320 - 31mm - f/4.0 - 1/320 - Manual Mode

Using the swivel screen for this portrait I was able to get a good angle of the products on the table as well as a good portrait of my subject. Shot at just above my waist level.

**When shooting from the hip so to speak, saying "eyes on me" doesn't really work anymore since "me" means my face rather the camera, that is no longer... At my face.

Ben's Brew operator pours me a sample of the cold brew coffee selection at the market. Totally bought some, super tasty.

A mix of Manual and AV mode - Edited to recover what highlights are possible. A very good test of the strong contrast in the midday sun.

ISO 320 - 57mm - f/3.5 - 1/250 - Manual Mode - Swivel screen overhead.

ISO 320 - 57mm - f/3.5 - 1/250 - Manual Mode - Swivel screen overhead.

A note with this shot, using the swivel screen overhead and getting a better view, there is one thing I noticed.

Click to enlarge. 

Obviously a lens issue, not really the body, but a testament to the sensor in the 6Dii maybe? (I am no expert) 

You can see that this lens produced some magenta fringing on the border of this white tent overhang. Yet with a click in Adobe Lightroom CC under 'Lens Correction | Defringe"...

Click to enlarge

Boom! ... It's gone.

I continue on... 

And I stop at 'The Soap Lady' tent and cannot help but take some photos of the colorful soaps and bathbombs that are all over the table.

ISO 320 - 28mm - f/3.5 - 1/500 - Manual Mode

I also stop by the Pioneer Valley tent with Wayne and take a few shots. 

ISO 320 - 24mm - f/3.5 - 1/800 - Manual Mode

A note of the shots below, while using live view I was taking a more candid shot of this honey vendor. I noticed that the live view focus really wanted to grab the closest object in the frame (the man's black sleeve). Even after lifting my finger and pressing down again, set to "one-shot" it refocused 2-3 times on the sleeve. 

Only after I used my thumb on the screen to refocus on the woman's face did it relent and keep that for the next few shots. Even though these are not really "keepers" it was a nice thing to learn and I can anticipate later when it is more important to get the shot in focus.

Stopping at the coffee truck 'BUZZED' I ask the barista inside for her portrait and she graciously agrees to pop out for a quick shot. 

This was a great look at the cameras abilities, I had to balance the shiny white surface of the truck to the left, the shaded face of the barista from the overhang above and you can still make out a tiny bit of the interior of the truck as I lifted the shadows a tad.

ISO - 38mm - f/3.5 - 1/320 - Manual Mode

ISO - 38mm - f/3.5 - 1/320 - Manual Mode

These next images are probably the best example of how the 6D mark II handles very strong, very direct sunlight, with reflective objects and materials.

As a bystander, I approach a melted cheese sandwich stand. The sun is beating down directly over head with a slight tilt, the vendor has a slab of cheese tilted toward the camera, there is white cloth around, all this light is being reflected harshly. 

I decided to include some SOOC (Stright Out Of Camera) and some final / edited images to show the range.

Click to Enlarge

Click to Enlarge

I continue on again, I find a beer vendor. I love this test subject. I see that there is one person inside of the cart, ready to dispense some brew, one person standing outside. The difference on their exposure is very apparent, one completely in shadows and the other in the direct sunlight.

Here are those shots from 'The Bootlegger' beer vendor at the market.

Some more portraits of some kids in the shade...

Some dads with their kids and food...

ISO 320 - 35mm - f/5.6 - 1/160 - Manual Mode

Panda Propaganda has some sweet T's for sale and I grabbed a portrait of the owner.

ISO 320 - 24mm - f/5.6 - 1/160 - Manual Mode

Another direct sunlight test of this awesome couple...

One over exposed and brought down... One under exposed and brought up.

Can you tell which?

Stopped by Zach Martinez' plot with his sweet glassware and cuts made from liquor bottles. 

www.ZaxWorx.com

At last I have made it through the entire market, grabbed a ton of portraits and challenged the camera, lens and I hope I have shown what is the range within Lightroom.

But as I get my bike, and start to head out, I see a musician on the side walk... I love taking photos of musicians and cannot help but take one more photo. 

ISO 320 - 39mm - f/5.6 - 1/200 - Manual Mode

Portrait of the talented Liza Hedges (@SLC_Accordion)


Phewww... 


OK, now that is quite a lot of photos. I hope that this has been helpful to see the range and capability of the newly released Canon 6D Mark II. 

I definitely know that everyone shoots differently, everyone edits differently, maybe some will not find the swivel screen useful? I do because being over 6'4'' I can lower my shot to my waist without bending over or dropping to my knees or I can easily raise my view above everyone for a different vantage.

My overall takeaways

- This camera handles very much like the original 6D, weight and grip are almost identical.

- The controls are almost the exact same, the only difference I noticed have to do with the focusing system.

The button to change focus area next to the shutter is awkward to my hands, I am not sure yet if it is becuase of the position, because it is new to me or simply I am so used to the toggle switch for the same function on the 5D Mark IV (Pictured Below)

- The camera has great auto focus overall, accurate and hits almost every time. The quirk to get used to is the very centralized cluster of AF points in the viewfinder and the tendencies of the LCD screen while in Live View.

- The touch AF on Live View is very quick to respond and the touch shutter is quick and accurate although I will need to play with it more to get fully comfortable.

- I do still wish there was a thumbstick for the AF points... The D-Pad works ok over all though and it is very much like the 6D

- I do wish there were two SD card slots...

Nikon D600/D610, Nikon D750, Canon 7D, Canon 7D II, Canon 1Ds III, Canon 5D III, Sony A6500, Fuji XT2, Fuji X-Pro2, Olympus OM-D E-M1 II, and so on... All camera bodies of similar or lower price that have dual card slots. Full Frame or not, this is a loss for the consumer. 

- I still do not care about the limited video functions... I do not use nor care about 4K video.

- I do think this camera should have been released at $1699 or so. The willful limitations placed on this model in comparison to other manufacturers offerings in the same price range are very hard to ignore.

- I do think the defense for Canon with people stating "well, it is an entry level full frame"... "it isn't for professional use" etc... etc... Is silly. It's professional, if you are doing professional work with it... A Rebel T3 can be professional if you're getting paid for the work...

But all that said? I will be keeping this body, it is a great 2nd body to my 5D IV, it IS better than the 6D albeit not as much as a lot of people would have liked. 

Personally I have too much Canon gear or Canon compatible gear to think about "jumping ship" ... I would just be losing money, I would have to get used to another system, I might miss work in the time it woud take to switch, and really would I take better images with another camera or should I just work with the tools I have?


Did I miss anything? Do you have any questions?     What other content would you like to see here?

Take a second and comment here or reach out to me on social media! 

Thank You For Looking!

If you are in need of a Photographer 

Contact me at LOGAN@LMSORENSON.NET 

or (801) 455-9957

QUESTIONS WELCOME!!!

Give a follow on

 InstagramTwitterFacebookFlickr, Tumblr

Proper Portraits - Proper Brewing Co.

On location at Proper Brewing Co.

A newly opened brewery in downtown Salt Lake City. I have been asked by SLUG Magazine to get some portraits of the beer experts for the their Beer Issue.

BEFORE THE SHOOT...

I was given a date, time and address to show up and I was just unaware of the exact shooting conditions. I knew I had to capture portraits of three people, I brought...

- My giant Photek Softliter Umbrella 60"

Xplor 600 Monolight

Impact C-Stand with Arm

Kupo C-Stand Wheel Base for easier movement.

- My trusty Canon 5DIV

Canon 6D a (as a back-up)

- Canon 24-70 f2.8 II

I also always have a back-up lighting source with my Canon 600ex RT speedlight, always tucked away in the bag just in case the location is not large enough for the giant 60" light modifier. Additionally I had...

Manfrotto Carbon Fiber Tripod

- Manfrotto 498RC2 ball-head if need be for a slower shutter speed and if not used for that, I could get some bts video with a simple Smartphone Tripod Mount. I keep and lug around all my camera gear inside a Lowepro AW 200 Messenger style bag (Awesome freaking bag). 

I was now prepared for 1. any lighting conditions with my large and smaller back up light source. 2. Zoomed in or wide shot to accommodate those same space variables with the 24-70 lens. And 3. With the 5D iv, and the dual pixel AF I could use the rear screen if needed to frame and focus any shot that placed me in a way that I was unable to use the viewfinder. 

ARRIVING ON LOCATION...

Upon arrival I grabbed my gear and entered the building. The front of the building was an open bar/eatery set up and I gave a few seconds to access my options for a few shots....

Thinking to myself (ok... there is a pool table... arcade... open area... high, long table...)
**Note: After a few minutes I realized I had just been brainstorming in vain. This was not the pre-decided location for the shoot, but rather the rear of the building, with the brewing vats and other contextually accurate pieces for the shoot. Never the less, do not ever stop planning shoots in your head, looking at lighting, ideas! Always getting ideas!

I was greeted by my group of subjects and I was invited to see the location of the actual shoot down the hallway. I grabbed my C-stand and wheeled my gear down and into the back-room.

John Kern, one of my subjects makes sure there is no water on the floor and the room was ok to shoot in.

John Kern, one of my subjects makes sure there is no water on the floor and the room was ok to shoot in.

Chosen background with the direction of light from the windows across the room.

Chosen background with the direction of light from the windows across the room.

I really liked the angle at which they pushed away from where I would place the subjects, the light from the window in the other room giving a nice, cooler quality to the ambient light. I am ready to get some shots.

SHOOTING...

I tell my subject what I am thinking, that I would love a casual portrait of them sipping a little sample of beer with a slight 'cheers' gesture perhaps? They make a joke about posing like Captain Morgan with a leg up on a barrell and I take a few test shots. 

Captain Morga pose

Captain Morga pose

Test shot to get the lighting just right.

Test shot to get the lighting just right.

After a few shots, I have the light just where I want it. I gesture to my subjects to face towards me, continuing in what pose they have naturally come upon. (Final Images At The End Of The Post).

Shooting #2...

I push my light (on wheels, so nice!) into the adjacent room and place it next to a vat (on the right of what is pictured), this gives the light some direction, looking natural as it is coming from a similar space as the window light.

I tell my subject to place themselves as they wish, suggesting perhaps to utalize the stair case, railings etc.

I take a few test shots and get things where I want them. Taking a few more shots, I tell my subjects to repeat casually talking, looking at each other, and every few seconds instructing them to have "eyes one the camera". This gives a relaxed, comfortable feel as no one is simply staring into the lens, awkwardly for a few minutes.

3E5A2637.jpg

Always with a "while we're all here, lights are already set-up" mentality, I figure I can get a few more shots even though I know I have my "Keepers" already. I have the subjects all stand and re-assemble into a sort of semicircle for a more head-shot look.

Shoot End... 

I had gotten what I need and my subjects were amazing, I thank them for their time and let them know I am done, and that I will be packing up my toys and heading out. We discuss beer for a minute and I tell them what my favorite qualities of my favorite brews are. I am graciously gifted a few recommended selections that Proper Brewing had recently been producing.

Again, thanking my subjects I gather my things and head to my car.

Final Images...

These following images were my final edits, final picks for submission to SLUG Magazine. I now just had to send them and await the issue to print. 

3E5A2621.jpg

And here are the used images in the issue and online a few weeks later.

www.slugmag.com

www.slugmag.com

.pdf copy of final issue. 

.pdf copy of final issue. 


What are some of your experiences while shooting, do you plan? Overplan? Overpack, Overshoot? Be sure to reach out and let me know or leave a comment. 

Thank You For Looking!

If you are in need of a Photographer 

Contact me at LOGAN@LMSORENSON.NET 

or (801) 455-9957

QUESTIONS WELCOME!!!

Give a follow on

 InstagramTwitterFacebookFlickr, Tumblr